User’s Guide
RELATIVE HUMIDITY
MAX
A
L
E
R
T
A
L
E
R
T
C
C
Model 445815 Humidity Alert II
Temperature
MAX
DEW Point
MAX
Humidity Indicator with Dew Point and Programmable Hi/Lo %RH Alarms
RH ALARM
MAX/MIN
RESET
Humidity Mold Alert
445815
Introduction
Operation
Calibration
Congratulations on your purchase of Extech’s Humidity Alert II
Remote Probe Hygro-Thermometer. Humidity alarms warn when
the %RH exceeds a pre-set HI or LO limit. The remote probe
conveniently mounts on the meter or extends for measurements
in ducts or remote locations. It also features Humidity and
Temperature adjustments. The unit can be wall-mounted or
placed on a flat surface using the fold-out stand. This
professional meter, with proper care, will provide years of safe
reliable service.
Preparation for use
RH Calibration
Open the battery compartment by pushing the cover on the
rear of the instrument downward as indicated by the arrow.
Remove the battery insulating strip and the protective film
cover on the LCD display.
1. Insert meter’s sensor into a salt reference bottle or humidity
chamber. The reference should be >70% RH.
2. Check the reading after 1 hour.
3. Adjust the RH calibration pot in ½ turn increments, waiting
for the display to update after each adjustment, until the
reading is within the accuracy specification.
Temperature Units
Select ºF or ºC units using the rear selection switch.
Audible alarm
Temperature Calibration
1. Place the sensor in a stabilized environment of
approximately 21°C.
2. Check the reading after 1 hour.
Select
or
using the rear selection switch to turn the
audible alarm on or off.
Maximum / Minimum display
Meter Description
1. Press the MAX/MIN button. The highest value measured
since the Reset button was last pressed appears on the
display.
3. Adjust the temperature calibration pot in ½ turn increments,
waiting for the display to update after each adjustment, until
the reading is within the accuracy specification.
1. Temperature-Humidity Sensor
1
RELATIVE HUMIDITY
2. %RH Display
3. Dew Point Display
4. Temperature Display
5. %RH LED alarm
6. Max/Min push button
7. Reset push button
MAX
A
L
E
R
T
A
L
E
2
2. Press the MAX/MIN button again to display the lowest value
measured since the Reset button was last pressed.
R
T
DEW Point
MAX
Temperature
MAX
3
6
3. Press the MAX/MIN button again to return to normal display
operation.
4
5
Specifications
RH ALARM
MAX/MIN
RESET
Humidity Mold Alert
445815
Resetting (clearing) the MAX/MIN memory
Range
Temperature -10 to 60oC
14 to 140oF
Accuracy
7
+ 1.0oC within -10oC to 50oC
+ 1.8oF within 14oF to 122oF
8. Sensor cable storage
9. Tilt Stand
1. Press the MAX/MIN button to enter the MAX/MIN mode.
13
15 11
2. Press and hold the RESET button for 1 second to clear the
memory and start recording new max/min values.
OC
A
l
.
O
n
OF
A
l
.
O
f
f
10. Humidity calibration adjust
11. Temperature units switch (ºF/ºC)
12. Temperature calibration adjust
13. Wall hanger
8
9
Humidity
10% to 99%
+ 4% RH within 25% to 85% RH
and 0 to 50oC or 32 to 122oF
Setting the %RH Alarm Limits.
Dew Point
-36 to 60oC
+/-2oC. @ 20oC
+/-3.6oF @ 68oF
1. Simultaneously Press and HOLD the MAX/MIN and RESET
button until “HI” and the stored HI %RH limit appears
flashing.
14
-32.8 to 140oF
(2) 1.5V 'AAA' cell
6 oz (169g)
14. Battery compartment
15. Audible Alarm ON/Off switch
Battery
Weight
10
12
2. Press the RESET button to set the Hi %RH limit. Hold the
button in for rapid adjustment.
Dimensions Display: 4.3x3.9x0.8” (109x99x20mm)
Probe: 0.57” (14.4mm) Dia.: 1.67”(42.4mm) L
Cable length 18” (457mm)
3. Press the Max/Min button. “LO” and the stored LO %RH
limit will appear flashing
4. Press the RESET button to set the LO %RH limit.
5. Press the Max/Min button to turn on or off the alarm. The
Battery Replacement
alarm icon
active.
will appear in the display when the alarm is
Note: If subjected to an electrostatic discharge the meter may
malfunction and require the user to perform a reset.
The low battery flag will appear on the display when the battery
voltage is low. Replace the battery when this occurs.
6. Press and hold the RESET button to save the settings and
exit the mode.
Open the battery compartment by sliding the battery cover on the
rear of the instrument downward as indicated by the arrow.
Replace the 1.5V ‘AAA’ batteries and replace the cover.
Copyright © 2005 Extech Instruments Corporation. All rights reserved
including the right of reproduction in whole or in part in any form.
www.extech.com
Alert
If %RH exceeds the HI limit or goes below the LO limit the
alert will be activated. The alert consist of two flashing
‘ALERT” icons in the upper display, a flashing red light (for 60
seconds) and an audible buzzer (for 60 seconds)
V3.1 10/05

 5秒后页面跳转


 SL74HC10N:高性能三输入与非门解析

 AIC1781A 电池充电控制器深度解析
 Pickering新高压舌簧继电器亮相汽车测试博览会
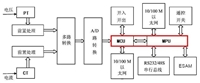 采用MCU+MPU双处理器架构实现的创新应用设计探索


 浙公网安备 33010502006866号 浙ICP备10014259号-119
营业执照ICP证
浙公网安备 33010502006866号 浙ICP备10014259号-119
营业执照ICP证


